Sheet MatrixAdd-in for Autodesk® Revit® that automatically renumbers views on sheets according to a user-defined matrix.
(Trial becomes permanent when Subscription License information is entered.)
Latest version: 2026, posted April 3, 2025. |
What you can expect from the Egan Sheet Matrix application:
Automatically Renumber Views On Sheets
This app automatically renumbers views on sheets according to a user-defined matrix.
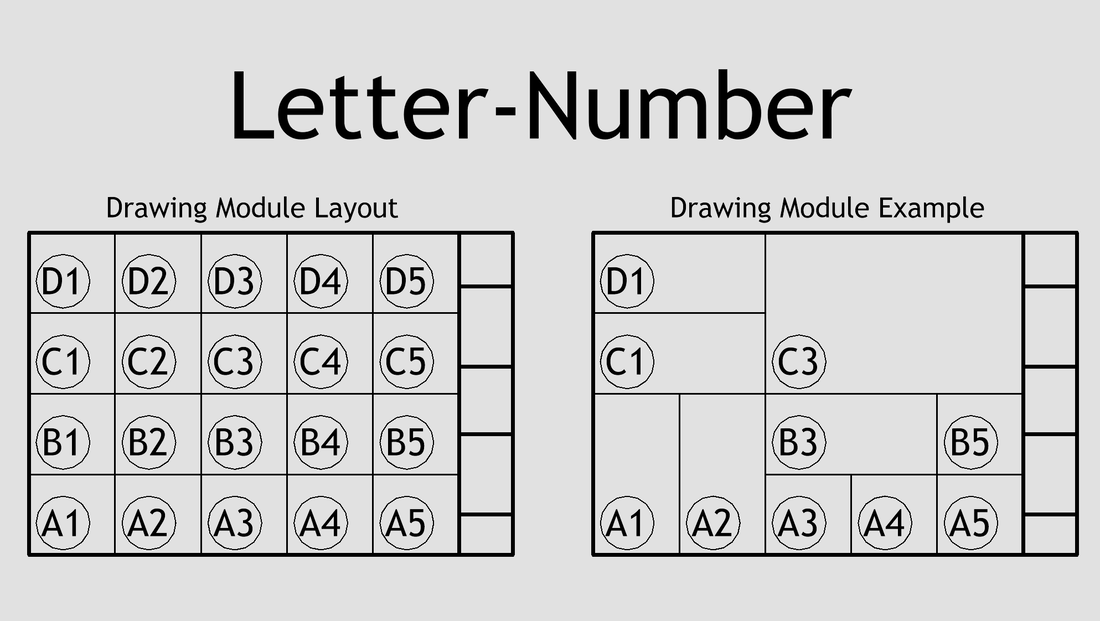
The app has been designed to conform with the Uniform Drawing System/ Drawing Area Coordinate System of the U.S. National Cad Standard. However, the app can be adjusted as required for each company.
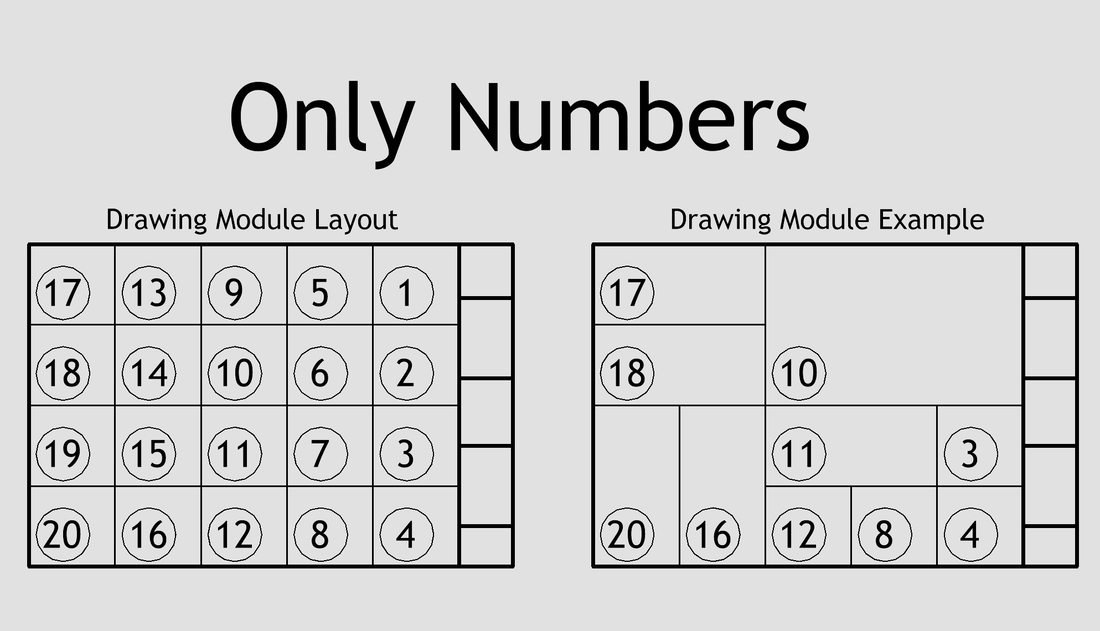
Only Numbers System
In addition to the standard Letter-Number system, new for 2025, but retrofitted back to 2022, the app now will now assign numbers in a fixed-number system matrix. See screenshots. To accomplish this, any time a matrix is assigned with only numbers, the app will add the numbers together instead of combining them.
A sample preset is provided on the Settings Form and additional matrix possibilities are provided on on the Egan BIM Resources website: https://eganbimresources.com/sheet-matrix-help.html.
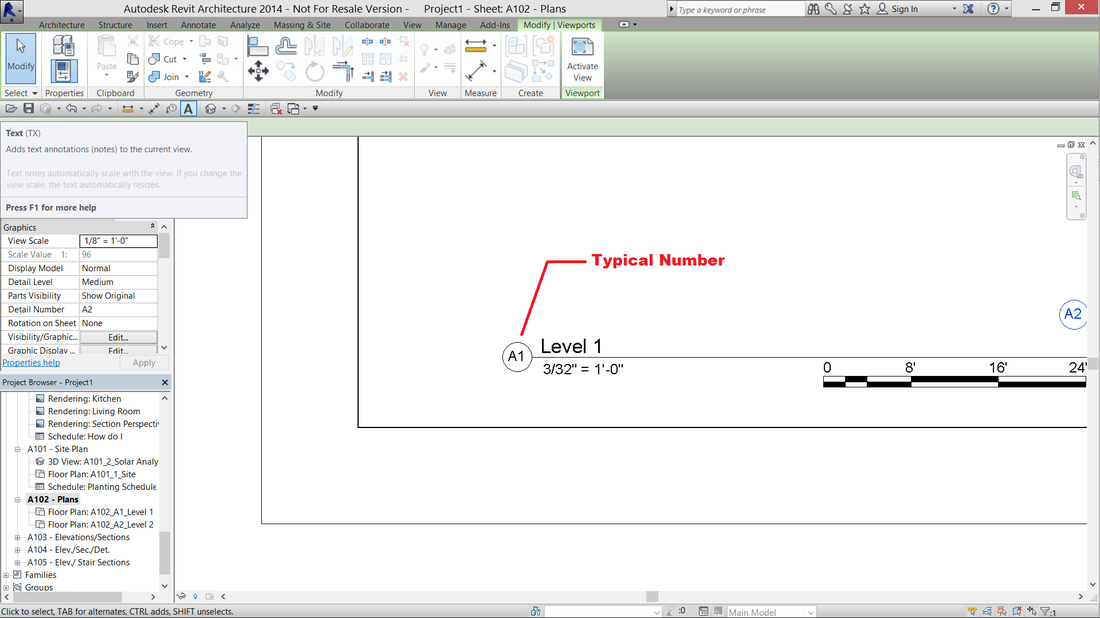
Typical Module Numbering
Typically, the app will renumber any detail that is placed on a sheet or moved on a sheet according to the currently assigned titleblock module.
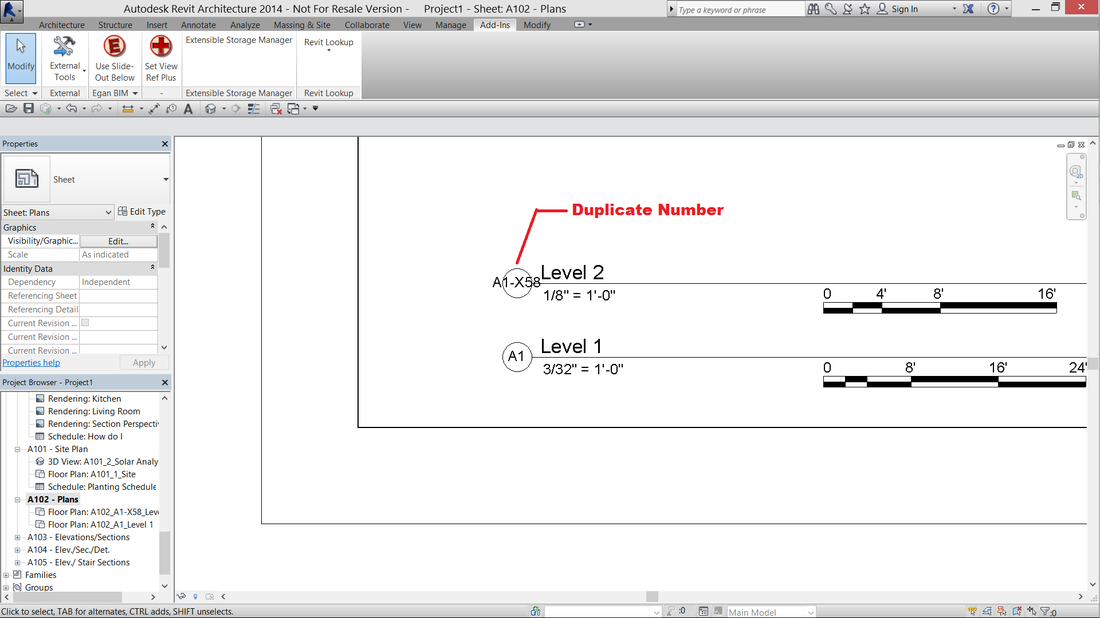
Duplicate Module Numbers
If there is a detail already placed in the module, the app will renumber the detail with the correct module number, but append one of the following, depending on the setting selected on the Settings Form:
1. A lower case letter, starting with “a,” “b,” “c.” This method will allow the duplicate to remain.
2. “x##,” where “##” is a random number, to indicate that the number is a duplicate. With this method, the user is responsible for recognizing and correcting duplicate module numbers.
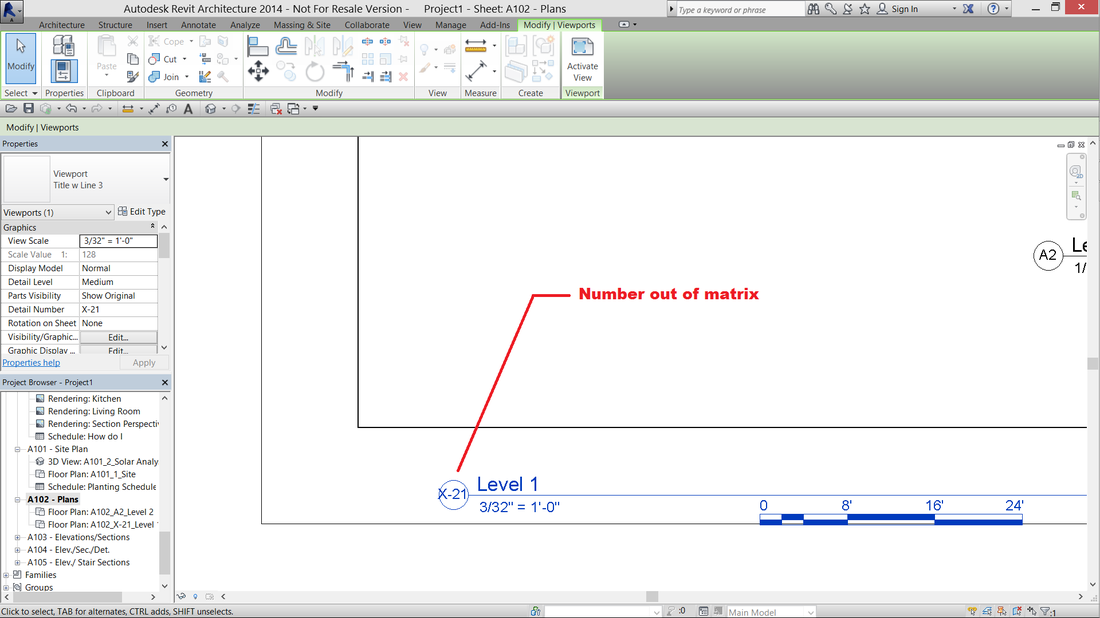
Out of Matrix Numbers
If a detail is placed or moved outside of the matrix, the detail will not be given a module number but will be numbered “X-##,” where “##” is a random number, to indicate that the detail is outside of the matrix. Other than this convention, the user is responsible for recognizing and correcting details that are outside of the matrix.
See screenshots below for more information.
Enable/ Disable By Sheet
The app provides a sheet parameter, “Skip Egan Sheet Matrix,” which, if checked, will disable the app for that sheet. This is useful for any sheet where renumbering of details may not be desired, like 3D views, door details and title sheets. The app default is to process all sheets.
Enable/ Disable By Titleblock Type
The app is based by titleblock type. Only titleblock types that have a sheet matrix assigned will have details placed on them renumbered.
Enable/ Disable By Project
To disable the app for the whole project, do not assign matrix settings to any titleblock types in the project, or, use the settings dialog to remove all assignments from all titleblock types.
Trial Information
The trial download provides a 60-day, full-functioning version of the app. After this time, you will need to purchase a one-year subscription license in order to continue using the app.
Screenshots
Usage
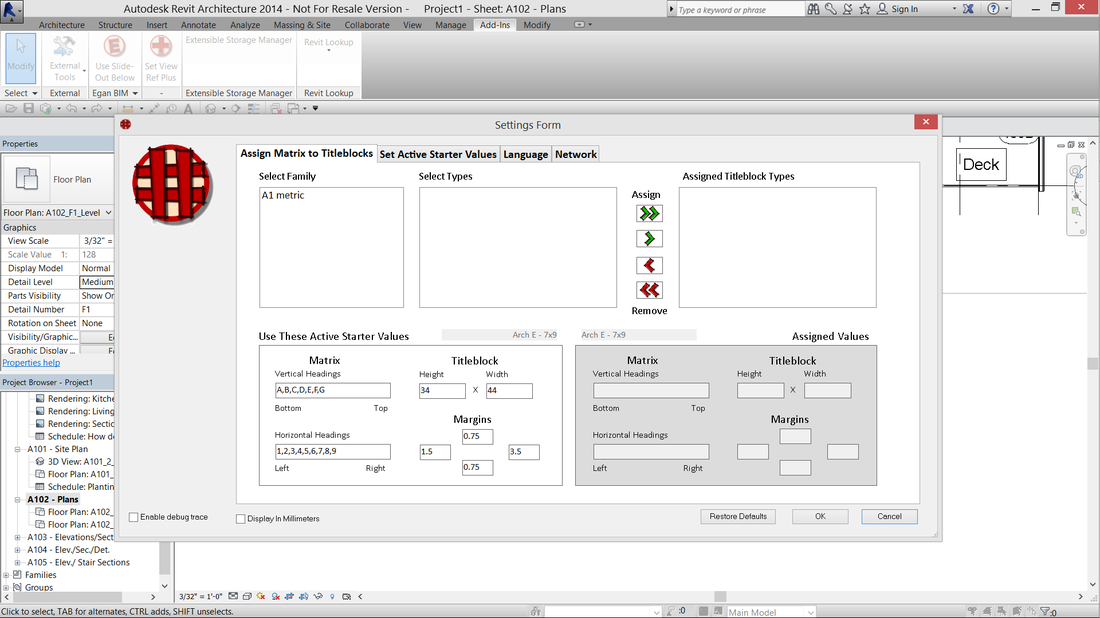
Once you install the app, it works in the background with very little need for input from the user. However, you may need to change some of the default settings, and modify the default matrix settings to suit your company.In Revit®, go to the “Add-ins” tab > and the “Egan BIM Resources” panel. Select the slide-out menu at the bottom of the panel to display the “Sheet Matrix” menu. Select “Settings” to display the Settings form.
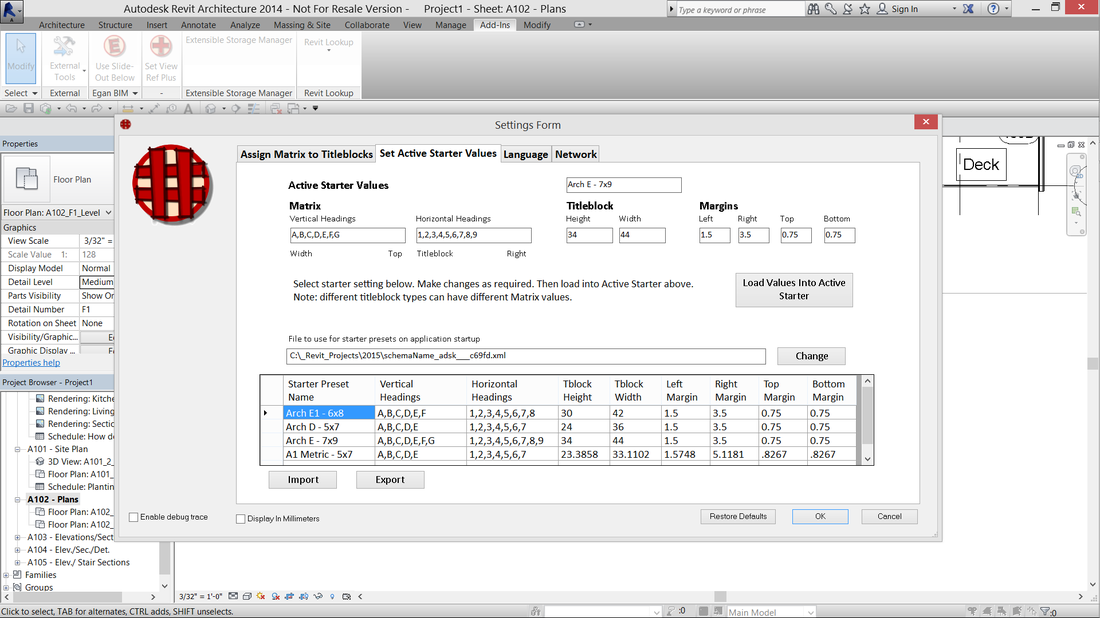
Select the “Set Active Starter Values” tab. From the “Starter Preset Name” grid at the bottom of the page, review the settings values. If you do not find a suitable preset, select the one closest to your required values and make changes as required.
Working with Active Starter Values
The Sheet Matrix app uses settings assigned to titleblock types as described below:
Starter Preset Name: A name for the group of settings that has meaning for your company, This is used for identity only; it is not actually used in the renumbering process.
Vertical Headings: The vertical headings for the modules, starting at the bottom, and separated by commas. The app will count the number of headings, create the appropriate number of modules and assign space to the modules in equal portions. Modifications to the module locations should be made by adjusting the margins.
Horizontal Headings: The horizontal headings for the modules, starting at the left, and separated by commas.
Titleblock Height: The overall height of the titleblock, including margins.
Titleblock Width: The overall width of the titleblock, including margins.
Margins
Small adjustment to the matrix can be made by adjusting both opposing margins. For example, to move the matrix up 1/4”, make the top margin 1/4” smaller and the bottom 1/4” margin larger. Adjusting one margin at a time will change the size of the modules.
Left Margin: Left margin of the titleblock, including staple area.
Right Margin: Right margin of the titleblock, including the designer, project and sheet identification blocks.
Top Margin and Bottom Margin: Top and bottom margins of the titleblock.
Assigning Active Starter Values
When you are satisfied with the values of a preset, select the button, “Load Values into Active Starter,” to make this your current starter Matrix assignment.
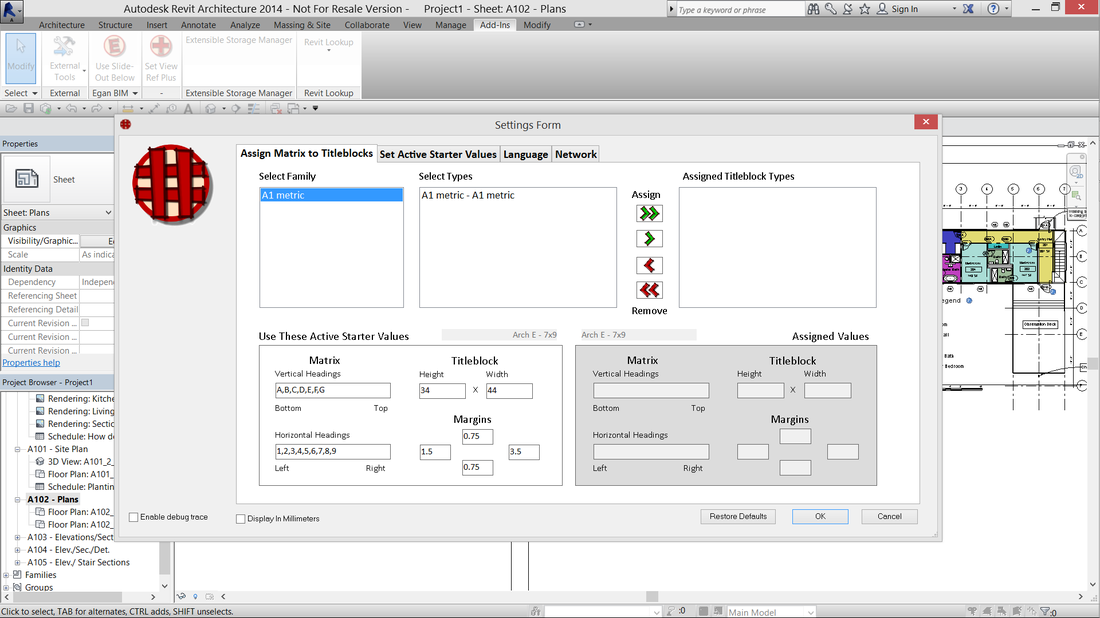
Now select the “Assign Matrix to Titleblocks” tab. To assign a matrix to a titleblock type, first select a Titleblock Family in the “Select Family” box. This will display all of the types of this family in the “Select Types” box. If you want to assign the Matrix to all types of the titleblock family, click the green double arrow, or, to assign the Matrix to just one type, select a type, and click the green single arrow.
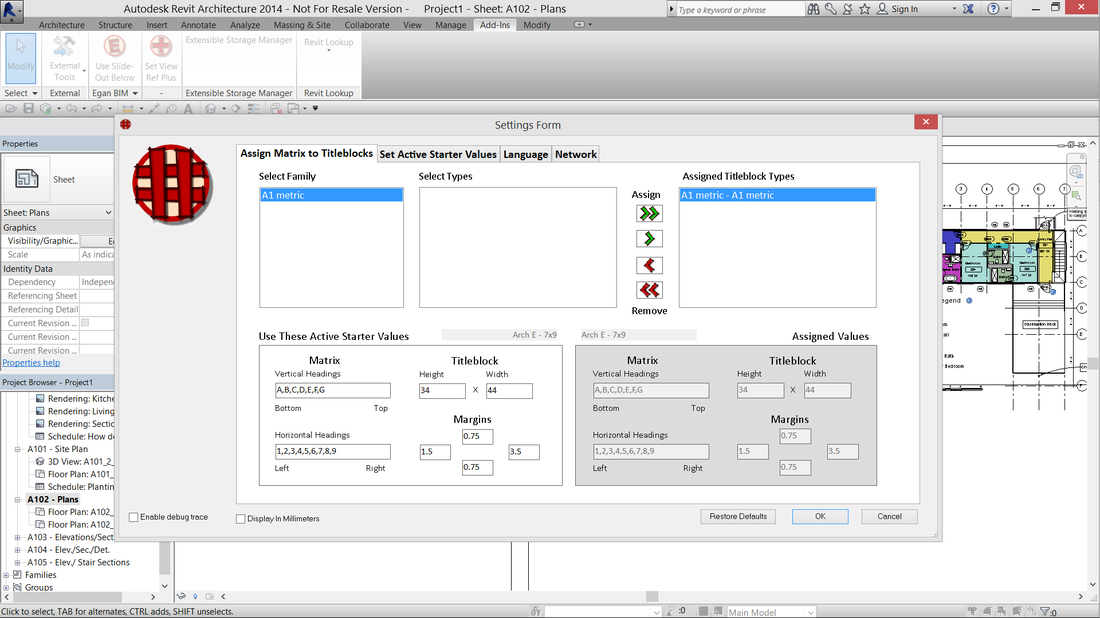
Titleblock types that have a Matrix assigned to them are shown in the box “Assigned Titleblock Types.” To display the stored values of a type, select the type and the values will be displayed in the “Assigned Values” box.
To remove the assigned Matrix from a type, highlight the type in the “Assigned Titleblock Types” box, and click the red single arrow. To Remove all the assigned Matrix from all assigned titleblock types, click the red double arrow.
To change the values of an assigned titleblock type, remove the type from the assigned box and reassign.
When you are satisfied with your titleblock type assignments, click “OK,” to return to Revit. The Sheet Matrix app will now automatically renumber details any sheet containing an assigned titleblock type.
Managing Starter Presets
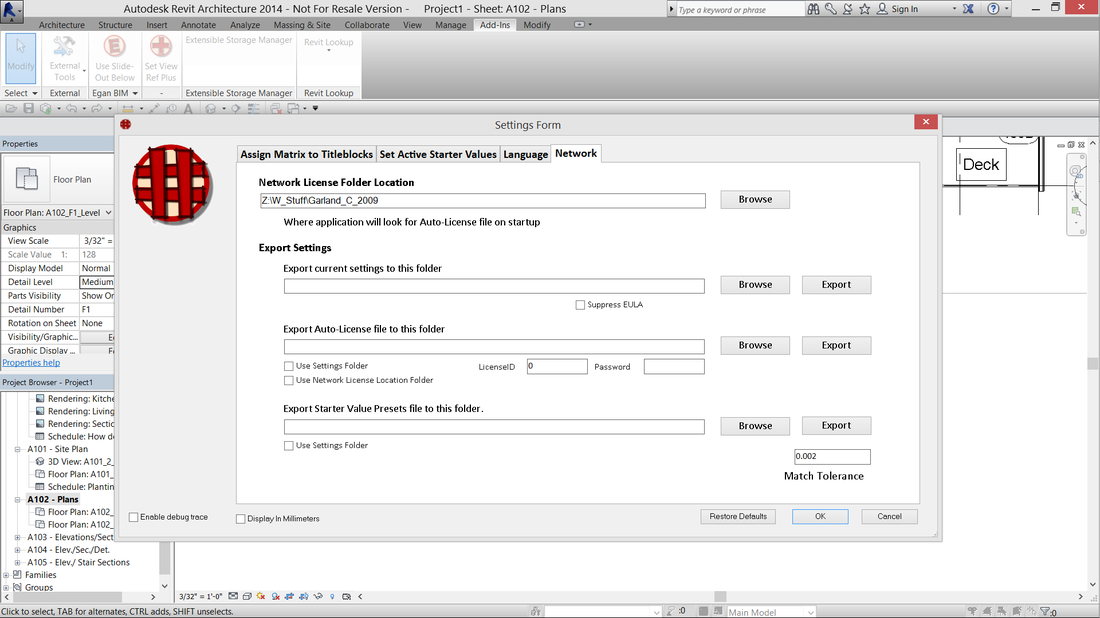
To make it easier to transfer settings between projects and computers, the app has an import and export feature. On the Settings Form, select the “Set Active Start Values” tab.
Adjust the settings as desired, and as described above. Delete unused settings and add as many new ones as you want. Once you have the settings the way you want them, you can save and reuse the file.
Use the “Export” button to export the settings to a location on your local drive or a network location.
Use the “Import” button to import a file from a saved location.
The app will load a starter presets file when Revit is opened, using the box, “File to use for starter presets on application startup.” If no value is shown in this box, the app will use the default file that was installed with the app. If a file is shown in this box, the app will use that one. If the file is located on a network drive, all computers from the company can use the same file.
Network deployment
If you want to include a network version of the Starter Presets File in your deployment, you need to establish this setting before continuing.
Start by selecting a network location to store the Starter Value Presets file. Go to the Settings Form, and the “Set Active Starter Values” tab. Make the changes desired as described above. Then go to the “Network” tab and export the file.
Then, go to the “Set Active Starter Values” tab. In the “File to use for starter presets on application startup” box, browse to the folder where the Starter Value Presets file was exported. When your application settings are exported, they will now include a network location for the presets file.
Please see the Network Deployment page for additional information on the network deployment features of Egan BIM Resources apps.
Additional Information
When you make the decision to use this app permanently, you can assign Sheet Matrix settings to all applicable Titleblock types in your template. Then the app will not need to have settings reassigned for every new project.
This app is licensed by application, not by version. Your license will allow you to use any year’s version on your computer at any time, so the use of this app will not affect your Revit® upgrade schedule.
This app is licensed by application, not by version. Your license will allow you to use any year’s version on your computer at any time, so the use of this app will not affect your Revit® upgrade schedule.
Version History
2026.0.1.10100 Updated for Revit 2026
2025.0.1.10439 Fixed issue when using non-printing characters in duplicate sheet numbers.
2025.0.1.10110 Updated for Revit 2025
Added Numbers-Only Matrix
2025.0.1.10110 Updated for Revit 2025
2024.0.1.10469 Added Numbers-Only Matrix
2024.0.1.10037 Updated for Revit 2024
2023.0.1.10834 Added Numbers-Only Matrix
2023.0.1.10094 Updated for Revit 2023.
2022.0.1.11199 Added Numbers-Only Matrix
2022.0.1.10125 Added Privacy Policy.
2022.0.1.10081 Updated for Revit 2022.
2021.0.1.10491 Added Privacy Policy.
2021.0.1.10181 Extensible Storage System Adjustment
2021.0.1.10063 Updated for Revit 2021.
2020.0.1.10546 Extensible Storage System Adjustment
2020.0.1.10400 Revision to Extensible Storage System
2020.0.1.10041 Updated for Revit 2020.
2019.0.1.10911 Extensible Storage System Adjustment.
2019.0.1.10765 Revision to Extensible Storage System
2019.0.1.10103 Updated for Revit 2019.
2018.0.1.11130 Revision to Extensible Storage System
2018.0.1.10468 Minor licensing changes.
2018.0.1.10087 Updated for Revit 2018.
2017.0.1.10455 Incorporated Sample/ Demonstration Files into app menu.
2017.0.1.10406 Minor change to settings.
2017.0.1.10204 Added setting to provide option for handing duplicates.
Fixed error at Settings Form display of Row/Column order.
2017.0.1.10162 Added setting to allow user to select right or left justified View Title.
2017.0.1.10098 Updated for Revit 2017.
2016.0.1.569 Added setting to provide option for handing duplicates.
Fixed error at Settings Form display of Row/Column order.
2016.0.1.527 Added setting to allow user to select right or left justified View Title.
2016.0.1.309 Corrected issue when renumbering Viewports with no View Title.
2016.0.1.255 Added All Products Suite functionality.
2016.0.1.228 Rebuilt after Revit/ C4R v2 update.
Added setting to flip/flop row/column on detail number.
2016.0.1.214 Fixed conflict with Revit/ C4R updates.
2016.0.1.092 Updated for Revit® 2016.
2015.0.1.674 Corrected issue when renumbering Viewports with no View Title.
2015.0.1.620 Added All Products Suite functionality.
2015.0.1.593 Rebuilt after Revit/ C4R v7 update.
Added setting to flip/flop row/column on detail number.
2015.0.1.579 Fixed conflict with Revit/ C4R updates.
2015.0.1.457 Minor licensing changes.
2015.0.1.423 Fixed problem when creating new file with template “<None>”.
Removed manual graphics at Settings Form Data Grid.
2015.0.1.392 Fixed error loading starter presets on app startup.
2015.0.1.352 Fixed errors when assigning Matrix to Titleblocks.
2015.0.1.344 Fixed error when displaying EULA with app menu.
2015.0.1.343 Added clarification on match tolerance factor.
2015.0.1.333 Fixed error on import of Presets.
2015.0.1.303 Added contextual help.
2015.0.1.277 Added Export Settings for Network Deployment.
2015.0 Updated for Revit® 2015.
2014.0.1.1039 Corrected issue when renumbering Viewports with no View Title.
2014.0.1.985 Added All Products Suite functionality.
2014.0.1.788 Fixed problem when creating new file with template “<None>”.
Removed manual graphics at Settings Form Data Grid.
2014.0.1.757 Fixed error loading starter presets on app startup.
2014.0.1.717 Fixed errors when assigning Matrix to Titleblocks.
2014.0.1.709 Fixed error when displaying EULA with app menu.
2014.0 Initial release Revit® 2014.
